"Infrastructure" First
The carpentry phase of the project will take quite a while since I will be working alone most of the time and working alone is several multiples slower than twice the time of two workers or three times the time of three workers. So, it makes sense for me to acknowledge the situation and spend as much time as necessary upfront to shorten and simplify the process downstream.
Consequently, I used a couple of substantial steel desks that I "inherited" to create a sawing station. I secured the compound miter saw to them well enough that stealing it would be too much trouble. By covering it with a tote to protect it from the weather, it can be left in place indefinitely. I created a way to lock the abundance of the drawers in the desks in one fell swoop so as to be able to store tools and supplies on site. Instead of installing temporary electric service and incurring a minimum per-month-charge for a meter, I ran a 10 ga extension cord from my workshop next door high enough overhead to be safe from tall vehicles. I made provisions for locking the ladders under a cover. And, as will be discussed below, I spent lots of time simply building a safe scaffold that will stay in place until after the drywall that can be reached from it is hung, taped and painted.
Sequencing Wall Construction
 |
| A must read for anyone doing construction alone |
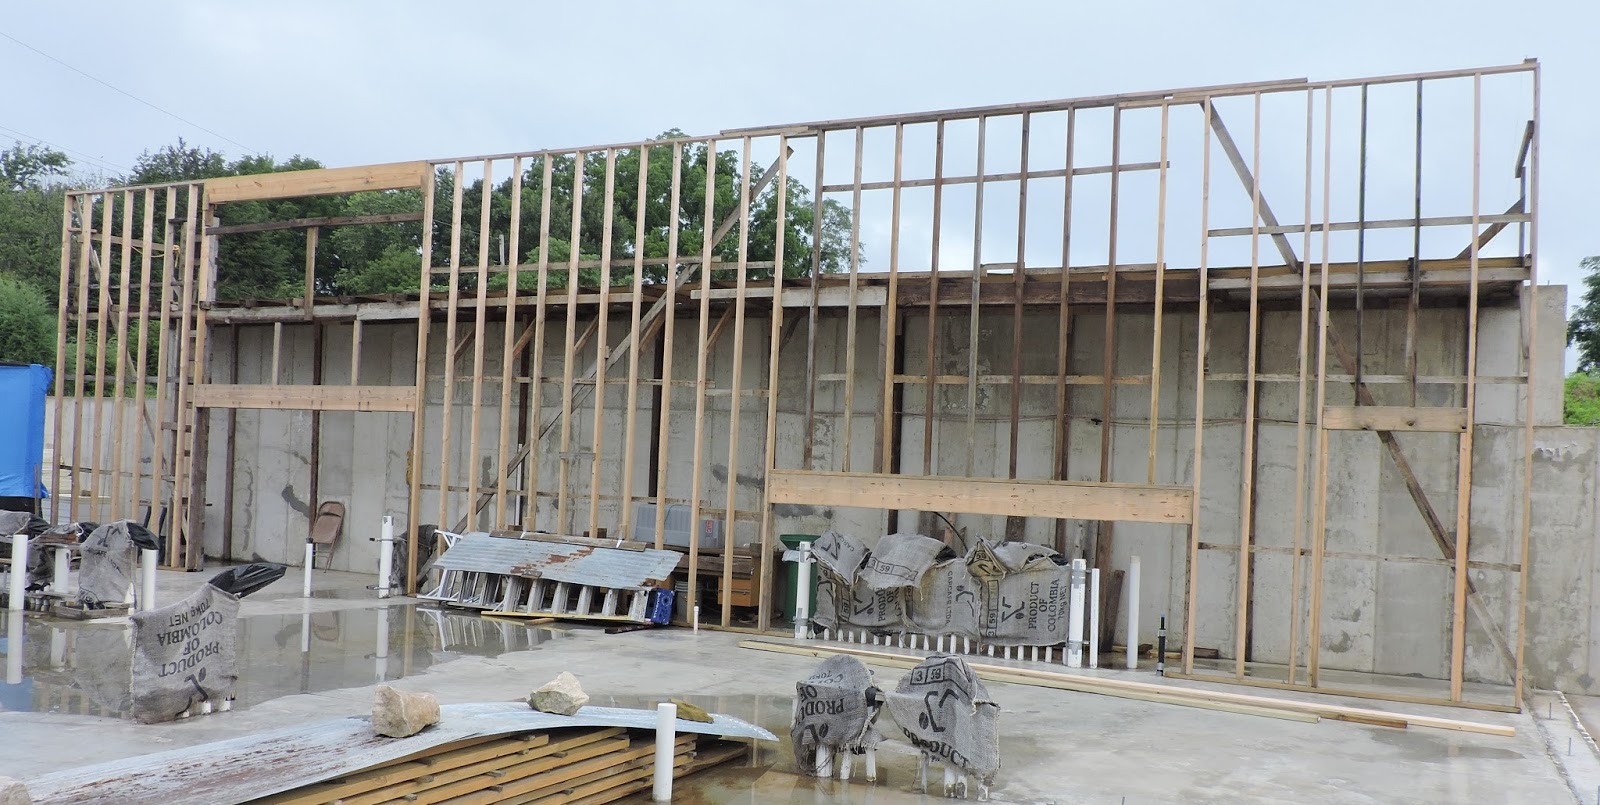
The Long and Tall Bearing Wall
The first wall is 56' long, 16' tall and parallels and stands 5' away from the north concrete wall. Eventually, it will divide the living space from the storage area (see the architectural drawings). Four of us raised it in three sections that I tied togetherlater via 2 x 12 headers and, for a short section, the second component of a double top plate. The fourth section (last photo below) was added subsequently with the help of volunteers.

Since the wall is so tall, scaffolding was necessary early on for joining the wall sections with a top plate or headers. The scaffolding will also be necessary later for adding a short truss wall to the top of the concrete wall and for setting the roof rafters. And, as mentioned above, It will stay in place until the dry-walling and painting above it are done. I suspended the scaffold between the two walls flush with the top of the 12' concrete wall. Not only does it serve as a work surface, it also holds the tall wall plumb until it can be tied to the roof. As you can see in the pictures, the scaffold framing is all salvaged lumber and the plywood deck has been weatherized with stain so it can be reused later.
 |
| Above left photo: interior view of scaffold. Right photo: exterior view of scaffold; notice stationary ladder and the rope from the pulley hanging from the guard rail that runs to a box below for raising tools and supplies to the scaffold |
It takes only a glance at the wall framing to appreciate the challenge of installing the three double 2 x 12 headers after the wall was raised while working alone, especially the one at the 16' height. I was able to do it primarily from reading John Carroll's "Working Alone". His individual methods come in handy but its major impact is the way it fosters a different way of looking at construction that makes the seemingly impossible quite possible. It would have been a real challenge to have assembled the headers on the floor then attempt to raise them by myself. So I raised the pieces for each header separately, which in itself was a bit of a challenge for the higher headers, and assembled them in place -- without Carroll's influence I probably would have been calling for volunteers and waiting until they were free.
The long low header to the right in the photo below bridges over the numerous stubbed-out ends of the PEX water supply lines that run separately to each faucet in the kitchen, bath and laundry (home-run configuration). They emerge from the concrete just barely behind the wall but the temporary bracing that holds them in place now would interfere with raising the wall in front of them. The header allows me to postpone piecing together the bottom of the wall until the bracing is removed.
Salvaged Lumber Situation
As you can tell by the color of the lumber in the tall wall, most is new. There were not many salvaged 2 x 4s long enough and straight enough for the job. Pre-building the wall trusses over the past couple of winters consumed most of the salvaged 2 x 4s that were in the eight-foot range and the section of the tall wall being installed in the photo below used the few that were longer. My current inventory of salvaged 2 x 4s is mostly boards that are less than 8' but will work or can be made to work, for most of the other interior walls. Ultimately, I do not expect to have to buy many new studs. As for the 2 x 6 walls, there will be enough salvage for all of them.
 |
| Frontal view of the wall after the section being raised in the next photo is in place; the headers to the left are in association with a second story room that protrudes through the wall; the header to the right bridges across the termination of a dozen or more PEX water supply lines (as with all the photos, clicking on the pic will enlarge it for better viewing) |
Initially after raising the wall, there were two large openings above substantial headers. As can be seen in the fourth photo, the opening to the left is to accomodate a second story balcony-like office that will cantilever through and extend 2' beyond the tall wall. Before the the photo was taken, the other opening to the right of the wall above the header that is just over the PEX plumbing rough-ins (under the burlap). The fifth photo shows the fourth and last section going in over the
 |
| The fourth section goes up with two of us pulling from the scaffold |
The Next Line of Bearing Walls
Actually, the next line of east-west "bearing walls" that are slated for the middle of the house, comprise as many post-supported beams as stick-built walls due to the open floor plan in the dining room/kitchen/living room area. These mid-line bearing structures will support the second story south wall and the catwalk just inside of it but not alone -- the floor framing for two second story rooms plays a role as well. All this will be covered in the next post.