Thursday, July 1, 2021

Design - Annualized GeoSolar System - Second Thoughts On Its Configuration

Annualized GeoSolar (AGS) is explained in a string of posts early in my blog that can be accessed by clicking on "Timeline - Annualized GeoSolar" near the top of the column at the left under the heading "Featured Post".  This post now questions whether our interpretation of AGS was ideal, at least for our build, and, if not, what might have been better.

Our AGS system utilizes the insulation/watershed umbrella and collector system first advocated by Stephens who, in turn,

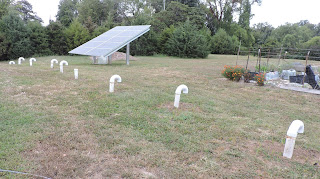
Solar collector in front of house
borrowed the umbrella concept from Hiatt.  Our system followed Stephens' prescription to the extent that the conduits run parallel from the collector to the front of the house then fan out under the floor of the house.  But, instead of converging behind the house in a "solar chimney" as Stephens recommended, our conduits continue on straight paths and emerge
Conduits widely separated behind the house

to daylight individually.  My reasoning was that, the conduits were slanted upwards sufficiently from the collector to daylight behind the house that the heat generated by the collector 
would rise through them unassisted.  I gambled that ending the conduits in a solar chimney would not significantly improve convection while anticipating that backfilling with the track loader around divergent pipes would be much easier than backfilling around convergent pipes (which largely would have been an arduous shovel and wheelbarrow job).

However, as explained in an earlier post, spontaneous convection did not occur due, I suspect, to the earth under the house being so cold as to reverse the airflow -- suck air through the upstream end of the conduits and expel it at the collector end -- to extent that the heated air generated by the collector was unable to reverse the flow.  I also suspect that, in a few years after the thermal mass under and behind the house warms to a constant year-round temperature in the '70s, a reverse flow would be much less likely to be a problem.  The basis for this assumption is thoroughly examined in the three posts at the top of the column at the left under the heading "Understanding Our Project".

Temporary Solution

Obviously, it would take a fan to change the direction of the airflow.  For it to work, the conduits would have to converge and empty into

The temporary configuration
a solar chimney just like Stephens recommended.  So we dry-fitted 4" drain pipes to connect the conduits with a temporary solar chimney made with dry-stacked concrete blocks with a stucco coating to seal any air leaks.  For a fan we repurposed a squirrel cage furnace fan and enclosed it in an airtight box setting on top of the blocks. 

It was soon obvious that the fan moved more air than necessary but we could live with that since the whole ugly-beyond-words setup would be replaced within at least a couple of years with a less complicated underground piping system and a permanent solar chimney outfitted with a proper-sized fan, either solar or hardwired.  The conduits have both  smooth and corrugated sections with the corrugated sections located under the house floor to caused turbulence in the air stream so that it would transfer more heat to the soil.  Interestingly, the air flow with the over-sized fan was strong enough to cause a gurgle/rumble sound that was detectable at the solar collector due to the air passing, probably too fast actually for greatest efficiency, through the corrugated sections.
 
Heat Transfer 

It took several weeks for the exhaust air to warm perceptively (holding a hand in front of the blower) because the soil surrounding the conduits was so cool that it absorbed all of the heat from the airstream before it made its way through the conduits even at the accelerated air speed.  The persistent coolness of the airstream was a positive in that it meant that heat was being lost to the soil as planned.

This scenario was playing out during July when temperatures -- day and night -- are as high as they get in the St Louis area.  So I suspect warming of the airstream was due to a combination of hot ambient air pulled through the solar collector by the fan and heat radiated by the solar collector.  I further suspect that the former contributes more heat than the latter.

Is the Solar Collector Really Necessary?

It is not a stretch to think that maybe the solar collector is overkill.  Maybe the AGS system could run on ambient heat without radiated heat -- at least here with our long and hot lower Midwest summers.  It is not hard to imagine a system without the collector that would comprise a "reverse solar chimney" or  "intake chimney" at the downhill side similar to the solar chimney at the uphill side.  The conduits would start out together at the intake chimney, spread out under the house like ours then rejoin at an uphill solar chimney that is outfitted with a fan to pull air through the conduits.

A simple store-bought thermometer inside our collector topped out at 120 degrees on sunny days so we do not know the maximum temperatures produced by the collector.  But it is safe to say that the temperature of the radiated heat is higher than the ambient heat passing through the collector from the outside.  But the solar collector is incapable of producing the volume of heat that can be realized from a constant stream of ambient air, especially on cloudy days when temperatures still reach the eighties and nineties and during hot summer nights.  However, harvesting warm air on cloudy days or at night would require a timer-controlled hardwired fan rather than a solar-powered fan.

Hiat demonstrated that just the heat gain through a few south-facing windows during Montana winters was enough to create comfortable year-round environment in a modest earth sheltered home that did not have an underground network of conduits and a solar chimney but did have a insulation/watershed umbrella.

In Passive Solar Energy Book, Edward Mazria

describes a school in Wallasey, England that runs entirely on passive solar energy.  It is a masonry building (lots of thermal mass) that is insulated on the exterior with 5" of foam board and has a glass south-facing wall comprising mostly translucent glass rather than transparent.  Its thermal performance in a climate thought to be marginal in terms solar energy harvesting was surprising.  Half of the energy required to keep the building comfortable year-round (fluctuations averaging only 7 degrees throughout the year) was provided by the sun with the other 50% supplied by heat from lights and waste body heat from the students.  The conventional HVAC system went completely unused.

What I Would Do Differently

I am beginning to feel that a full-blown Stephens-like AGS system is unnecessary, at least in our climate.  Here are the reasons why.

The thermal performance of our partially-insulated house last winter -- insulation in the walls and ceiling of the first floor and some of the walls on the second story (but not the ceiling) -- and how subsequently the fully-insulated house has remained cool well into this summer even with all operable windows open fulltime and a large industrial fan pulling warm outside air through them 24 hours a day (which we are doing in order to drive more heat into the thermal mass, making the house warmer for the first winter), leads me to believe that, if...........

-- A house is at least partially earth sheltered and has an insulation/watershed umbrella extending outward from the house 16 - 20' in order to increase the amount of dry thermal mass beyond just the floor,

-- There is an abundance of south-facing windows with as much translucent (vs.transparent) glass as possible and there is minimal glazing on the north and west sides,

-- The house envelope is super-insulated and equipped with high R-value windows and doors,

-- The colors of the exterior of the house are highly reflective,

the amount of heat gain needed to warm the thermal mass and maintain comfortable year-round temperatures becomes so minimal that it can be accomplished without a labor-intensive and rather expensive solar collector.

Knowing what I do now, I would be inclined to replace the solar collector with an intake chimney and add a solar fan to the solar chimney to pull warm-hot air through the conduits from late spring until early fall then welcome passive solar heat through the south-facing windows from late fall until early spring.  Then, with the addition of a third heat source --heat generated by merely living in the house such as cooking, baking, dishwashing, showering and waste heat from the bodies of its occupants -- I am confident that the three heat sources would be enough to maintain a comfortable environment during the cool/cold months and the insulated and reflective house and insulated thermal mass would extend the comfort through the warm/hot months.

Cost Considerations

So, is our AGS system with its solar collector, conduits and solar chimney considerably more expensive than a system without the collector would have been?  The collector indeed was the most expensive component in the system -- cost of excavation, cost of concrete blocks and parging cement, cost of corrugated roofing, tempered glass and fencing to finish it off.  My original intent was to hold the cost of the entire AGS system to something less than conventional HVAC but, if it did cost less, it was only marginally.  Without the collector, it definitely would have cost less and would have chopped several weeks off of construction time.

Future Reporting

We will be moving into the house in a couple of months which will give us a chance to begin monitoring and reporting on its thermal performance over time.  Popping up through the floor in the middle of the house is a PVC pipe that was installed a few years before ground was broken.  It was one of four piezometers used to monitor the water table so as to be sure that it would not rise during wet years and syphon heat from the thermal mass under the house.  I plan to repurpose it as a way of dropping a thermometer into the thermal mass to measure its temperature at various depths and intervals.  Eventually we will have a better data with which to judge the efficacy of eliminating the solar collector from the design of the AGS system.

Wednesday, May 26, 2021

Design -- Sustainable Flooring Choices

The time is drawing near when decisions about flooring have to be made.  The substrate for the first story floor is concrete while that of the second is tongue and groove OSB.  When it comes to winter heating for our passive solar house, the difference in substrates dictates flooring choices, irrespective of the usual factors such as esthetics, durability, ease of installation, ease of maintenance, life expectancy and price.  Following is the reasoning behind our final choices.

First Story

Deciding on the type of flooring for the first floor is a no-brainer -- either concrete as the finished floor or concrete overlaid with porcelain tile, either of which fits with our AGS design*.  Porcelain tile is reasonably easy (but time-consuming) to lay, quite durable and there is an abundance of patterns nowadays mimicking wood grain in all price ranges.

Direct gain on an insulated concrete floor (the thick
 black border outlining the house represents insulation).

The concrete floor and the soil beneath it are part of the thermal mass that makes our AGS system work.  The nearby picture illustrates the classic passive solar design -- sunshine on an insulated concrete floor.  In our case, the floor is not insulated so that the earth below the floor (not just the concrete) is warmed by the sun shining through the windows (direct gain) during the cold months to supplement the indirect gain it gets from the solar collector during the warm months.  Concrete, and presumably porcelain tile, are good choices because they conduct heat in and out of the mass, although I was unable to find any definitive information about whether thermal conduction for tile and thin-set match that of concrete.

At first blush it might seem that concrete or tile would be cold underfoot during cold months as would be expected with tile over concrete in a conventional HVAC environment whereby the air is heated rather than solid matter and the soil under the slab is poorly insulated.  In our situation, the heat is in the mass, not the air, so that the floor temperature tracks with the temperature of the underlying mass, varying only a few degrees year-round -- maybe a little warmer in summer and a little cooler in winter but remaining within a narrow comfort range.

Final Choice for the First Story

Having said all of this, our final choice was to bypass the tile altogether and return to our original inclination -- polished and stained concrete.  We had four reasons for favoring bare concrete.  First, tiling 1,700 square feet would have been a job too difficult and time-consuming for DIYing despite owning a commercial-grade tile saw and having considerable experience with tile work.  Second, buying the relatively inexpensive woodgrain porcelain tile of our choice at $1.79/sq ft plus $8/sq ft for professional tile setting would make the total cost just under $10/sq ft.  The cost of polishing and staining the concrete ran $6/sq ft, saving us a little over $7,000.  Third, we were not willing to commit to a forever responsibility for cleaning and maintaining a houseful of grout joints when polished concrete is about as low-maintenance as floor surfaces get.  Finally, in order for our AGS system to function properly, heat must pass freely through the floor to and from the heat storage mass below and the living space above.  By dispensing with tile, except for the airlock inside the main entrance, the issue about its thermal conductivity relative to concrete becomes moot.

Second Story

Flooring choices for the second story are less stringent because the amount of thermal mass is so limited.  Having said that, there might be one instance in which it might be marginally important.  If we were to overlay the OSB subfloor with a layer of cementitious board then install thinset-bonded porcelain tile, the cementitious board, thinset, tile and subfloor together would provide a thin veneer of thermal mass capable of absorbing a limited amount of heat on sunny days and re-radiating it at night.  But, since the glass of all but two of the second story windows is translucent rather transparent, most of the winter sunlight is diffused rather than concentrated on hard surfaces like the floor.  The diffused radiation, while it will not heat the inside air, will randomly warm the contents of the room, in which case, the floor would receive some of the energy and contribute slightly to a comfortable environment.

If we wish to overlook the slight thermal advantage of the tile floor, there are three other flooring materials that we might consider and one other that, for a green build like ours, should be avoided.  First, the one to be avoided -- the popular solid laminate flooring.  With a nod to its beautiful wood patterns and its DIY-friendly installation, it is a petroleum product that does not fit our commitment to sustainability.

That leaves three other choices -- bamboo, real hardwood and a new product, composite laminate flooring.  Bamboo at first glance would seem to be a good choice from a sustainability standpoint since it comes from a rapid growing ubiquitous grass instead of mature trees.  However, its embodied energy, mainly from manufacturing then transportation from the orient, makes it less appealing and its durability and life-expectancy is less than tile and real wood.  Hardwood flooring would be a good choice if limited to native species (excluding old-growth stock) rather than exotics from distant lands.  Wood composite flooring is the new kid on the block.  It looks and installs like solid vinyl laminate but is a certified green product eligible for LEED points made mostly from post-industrial recycled wood chips.  It also has all of the qualities of the best of vinyl products such as hardwood realism, stain and scratch resistance and 100% waterproof protection.  Needless to say, composite flooring was easy choice for the second story.

Prices

Of the choices we would consider, hardwood is the most expensive at +/-$8 per sq ft DIY-installed and +/-$19 per sq ft contractor installed.  Tile, even with the added expense of cementitious board, is least expensive at a little more than $2/sq ft if DIY installed (but +/-$10 sq ft, if professionally installed)  Bamboo is intermediate.  The DIY-installed composite laminate that we selected ran $2.75/sq ft.

What About Carpeting?

Until I read Mazria's book, I assumed that carpeting of any sort would have no place in a passive solar build where the floor is part of the thermal mass.  However, Mazria makes sense when he says "Do not cover a masonry floor with wall-to-wall carpet.  Carpet insulates the heat storage mass from the room.  Scatter or area rugs, covering a small area of the floor, make little difference".  We plan to use an area rug in the master bedroom and a few scatter rugs around the rest of the house especially after a year or two when the year-round temperature of the thermal mass has reached equilibrium.

_________________

*For those who have not followed the blog enough to know about the Annualized GeoSolar system that will provide year-round comfort in the absence of conventional HVAC, click on the title under "Featured Post" near the top of the left column.


Monday, March 22, 2021

Construction - Drywalling

Drywalling has been ongoing since the summer of 2020.  While this post contains some new information, it also overlaps the previous post on rice hull insulation.

Atypical Sequencing For The Drywall
The sequence I am following for drywalling is dictated by the use of rice hulls for insulation and having to work largely alone during the early months of COVID-19.

The interior partitions were drywalled first followed by the exterior walls and ceilings starting 
with the lower drywall course on the walls followed by the higher courses then on to the
ceiling one course at a time (as shown in the picture).  By positioning the insulation blower (blue object in the center of the picture) at the foot of the temporary steps, all areas of house could be reached with its hose without moving the blower.

The industry standard is to drywall the ceilings first then the walls where the panels are hung horizontally starting at the top and working towards the floor with the top panel supporting the edge of the ceiling panel.  I am doing the opposite -- hanging the walls first starting at the floor followed by the ceiling. Since cutting the second or, in some cases, third course of wall panels at just the right height to support the ceiling panels is impractical if not almost impossible, I had already added nailers to the tops of the partitions to which the edges of the ceiling panels could be screwed for added support between trusses.  Instead of drywalling the entire house in a random fashion, we concentrated first on the interior walls and ceilings that will not be insulated -- bathrooms, closets, bedrooms, kitchen, dining room and living room.  The reason for delaying drywalling and insulating the shell of the house until colder weather was to allow time for the thermal mass to store summer heat one last time.

Fortunately, I could hang most of the wall panels working alone with the help of custom jigs in lieu of a second pair of hands.  For the longest panels on the second tier, I could call my wife, Dorothy, to come over from our residence next door to help.  By mid-fall, with periodic COVID testing and masking, we felt comfortable accepting help from two family members with handy skills.

Drywalling the Insulated Exterior Walls and Ceilings
The 15" thick exterior walls were drywalled one course high then filled with rice hull insulation.  We then hung the second course of drywall and filled behind it by working through the duel top plates.  The top of the wall was filled to overflowing before the first course of drywall was hung on the ceiling next to the wall and filled with hulls in order to be sure that the junction between the wall and ceiling was tightly packed.  After the first ceiling course was filled as much as possible without spilling over the edge, the second course was hung and similarly filled with hulls.  This pattern of hanging one course of ceiling drywall at a time then following with the rice hulls continued up the cathedral ceilings until the opposite wall was reached for both the first and second floors.  Segmenting the ceiling work to one drywall course afforded the opportunity to use a "T" shaped plunger made from 2 x 4s to pack the hulls as they went in, thereby eliminating any voids.

The cut-outs for pipes and electric boxes in the exterior walls and ceilings had to be handled differently with rice hulls.  Extra effort was needed to minimize the size of gaps between the drywall and a pipe or box and the holes for the wires in the back of boxes have to be occluded as well.  Otherwise, the hulls are forced through them when the insulation is blown and would probably leak out ever afterwards.  A few larger cracks were filled with minimal-expanding foam, particularly around ceiling boxes whereby the foam will be hidden under the shroud for light fixtures or ceiling fans.  A couple of larger cracks around wall boxes were filled with non-shrinking plaster-of-Paris.  As explained in a previous post, smaller gaps around some wall boxes were sealed with Zip tape including using an undersized switch plate as a guide for trimming so that the edge of the tape would be hidden under a full sized plate.   

Helpful Techniques
I had done a modicum of drywalling in the past and thought that I was reasonably good at it, that is, until I  researched the subject in earnest. 

In the end, though, all I really needed in the way of enough information to upgrade my skills sufficiently was Myron Ferguson's book, Drywall.  Following are a couple of his hints that were especially helpful when hanging the walls.


When hanging large sheets on walls working alone, he suggests starting a nail where you knew it would hit a stud then lifting the panel to place and driving the nail to hold the panel until it could be properly fastened with screws.  

A second hint was a nugget -- an easy and accurate way to cut around electrical boxes and plumbing pipes, at least for the lower course of drywall -- without time-consuming measuring and cutting before hanging the panel.   First use a carpenter's square or a spirit level to mark the coordinates of each box or pipe on the floor then hang the panel with a few screws at the top.  Using the coordinates, it is then easy to zero in on the hidden box and cut around it with the tool of my choice, an oscillating tool.  When done right, the space between the box and the drywall was essentially only the thickness of the oscillating blade which, I would like to think is enough to satisfy most drywall tapers' wildest dreams, as opposed to the cruder cuts made by the thicker blade of a punch saw or the rotating blade of a drywall router, to say nothing regarding inaccurate holes precut from measurements.  When the panel is free to slip to place around the box without forcing, it can be screwed to place.

Taping the Joints
Morrison also had four recommendations for locating the joints between panels.  First, whenever possible, run the panels horizontally and, if running them vertically, only do so when the panels reach uninterruptedly from floor to ceiling -- say, 8' panels for 8' ceilings.  In either case, the most conspicuous joints are formed by the sides of the panels that are tapered and designed for taping.  The advantage of running the panels horizontally is that it increases the strength of the wall.  A second Morrison suggestion:  when butt joints (those at the ends of panels which are not tapered) cannot be avoided, they should be located near the corners of a room where the additional bulk of joint compound is less likely to be noticed.  His third suggestion is to avoid butt joints near doors and windows where the extra thickness of compound invariably compromises or complicates the fit of casement molding.  Instead, cover doors and windows with long pieces of drywall and expose the opening after fastening.  The latter is best done by sawing the sides of the opening and using a knife at the top of the opening to cut the paper on the backside then breaking the piece before cutting the paper on the front side to free it.  With window openings in conventional walls, the top cut must be made before the panel is installed but, in our case, the walls were so thick that the window openings could be handled like doorways, i.e., reaching in to cut the back side at the top after the sides had been cut with a saw.

Since I did not intend to do the taping myself, I was motivated to take as much care as possible to make the drywall look like it was hung professionally, especially when cutting around electrical boxes and plumbing stub outs and butting at the corners.  I also took responsibility for installing the metal corner bead on outside corners.  The final step was to drag a wide taping knife over the surfaces of the drywall in conjunction with inspecting it visually to find and fix any screws that were not properly countersunk.  The last thing I wanted to do was to cause a taper to raise his or her price to cover sloppy hanging or to be unwilling to work with a DIYer at all.

Saturday, January 9, 2021

Construction - Insulating with Rice Hulls - Filling the Wall and Ceiling Cavities

 This is the fourth post on rice hulls for insulation.  The first was back in 2016, a couple of years after I learned about insulating with hulls.  That post was an attempt to confirm their efficacy and understand the uncommon logistics involved with buying, transporting and getting them into a structure.  Two recent posts set the stage for this post that describes the actual use of the hulls for the wall and ceiling cavities.

Reminder:  click on any picture to enlarge it for better viewing.

Buying the Rice Hulls and the Diatomaceous Earth

It appeared that Riceland Foods, Inc was willing to sell direct (instead of referring to a dealer) only because of the size of our order.  Their hulls come in two configurations -- large bales or 50 lb bags -- with the latter seldom sold to end-users, especially consumers, in truckload quantities.  Consequently, our order triggered a special run that needed to be picked up almost immediately after ordering.  I had been proactively in contact with a freight broker who promptly caught a ride for the shipment and was able to schedule it to arrive on Friday so that we could offload it over the weekend. 

Buying food grade diatomaceous earth (DE) was made easy by a local farm and home store that handled it in 40 lb bags for mixing with livestock feeds.  The DE as an insecticide will not only kill rice weevils but any other insects with exoskeletons (hard shells), apparently for as long as the building exists.

Receiving the Rice Hulls

With a crew of 11 and three pickups, 768
 bags of hulls were moved from the semi-trailer
 to our building site in less than 7 hours.
As mentioned in the previous post, our construction site on a narrow one-way street makes it is nearly impossible to receive shipments from semi-trailers unless the driver is willing to exit by backing for several blocks.  And, if s/he were to wait while the trailer was offloaded, we would need a forklift. Therefore, we received the order in a drop-off trailer on a merchant-friend's parking lot and off-loaded it by breaking down the pallets and handling all 768 bags one at a time. Thankfully, we were blessed with enough volunteers and pickups as well as ideal weather for December in the Midwest to have the trailer unloaded in less than seven hours.

It was a bit of a problem storing the hulls and still having access to the exterior walls for insulating and additional drywalling.  They occupied over half of the space in the garage and most of the non-bedroom, non-bathroom floor space on the first floor.  However, intentional sequencing for blowing the hulls quickly eliminated the bags that were most in the way. 

Blowing the Hulls

We positioned the blower in a central
When the blower was positioned at a central location (arrow),
the hose reached all recesses of the building.  Each bag of hulls
was opened, dumped into the mortar box in front of the blower
 and sprinkled with a cupful of diatomaceous earth.  At the time of
this picture, the bags stored in this area were used first in order to
create working space.
location on the first story from which we could reach all exterior walls, upstairs and down, with the 50 foot 3" diameter blower hose. I handled the business end of the hose, not because it required much skill, but because it was extremely dusty and not something I wanted anyone else to have to deal with. At the blower, a bag was laid in a mortar box and cut open to release the hulls that were compressed and under pressure.  The hulls were then sprinkled with a cupful of diatomaceous earth and scoop-shoveled into the hopper of the blower.  The flow rate was
Friend, Bob, loading the blower hopper with hulls at the
rate of about one bag every five minutes. 

t

less than 5 min per bag which we thought originally would be too fast for one person working alone to manage. However, after a little practice with two at the blower, we found that one person could in fact keep up.  The guy(s) working at the blower were already wearing N95 or equivalent masks due to COVID-19 although the amount of dust was minimal.  At the business end of the hose, the dust was so problematic that, in addition to an N95 tight-fitting mask, I wore swimming goggles, long sleeves, tight collar and gloves.


With rice hulls, as opposed to fiberglass or cellulose, the hose clogged more readily, presumably due to their greater density.   We found two maneuvers that eliminated clogging.  One was to fine-tune the flow rate by trial-and-error and the other was to make sure that the hose was kept as straight as possible and, when bent, with curves as sweeping as possible.  And, in addition to these efforts, I needed to be careful that the end of the hose did not bottom out and become blocked by the hulls already in the wall or ceiling.  The good news was that the flow rate was not diminished when the hose was elevated to reach the ceiling of the second story.


Second Thoughts About Diatomaceous Earth (DE)

After a day and a half of blowing rice hulls, we began to wonder whether the dust created by blowing was due to the DE rather than the hulls themselves.  By that time we had finished insulating behind the first course of drywall on the first floor and the interior of the building was already pretty dusty.  It was hard to say whether it was hull dust or DE dust or a combination.


During the interval for installing the second course of drywall, I did more research on the health risks associated with DE (I was definitely motivated to do so after experiencing mucus-like drainage from my red, itchy eyes for a couple of
days after the first session).  The search yielded enough information to warrant a bit of caution.  The major concerns are pulmonary effects and eye irritation.  The former was a non-issue for us in that the warnings apply to workers who experience long-term exposure such as those mining and processing DE and 
we were already wearing N95 masks which, according to the online sources, was adequate for DE dust.  The latter concern, eye irritation, was real for me after being at the business end of the hose but not a concern for those working at the hopper.  It motivated me to search for goggles that sealed against the face better than the ones I was using and to consider alternatives to mixing the DE with the hulls before blowing.

In order to decide whether to continue mixing DE with the hulls, we blew a few bags of hulls without the DE to see how dusty they would be compared to rice hulls with DE.  As I had hoped, the amount of dust with or without DE seemed to be a wash.  Since I would be the one at the dusty end of the blower hose and would rather not miss the opportunity to have walls and ceiling laced with a deadly but environmentally-friendly insecticide, I decided to continue with the DE.  By the time the second stage of drywalling was over and we were ready to resume insulating, I had bought tight-fitting swim googles that eliminated most of the eye irritation that I experienced after the first session.  However, the amount of dust at the business end of the hose, even with masking and goggles, made the job extremely unpleasant to say the least.  

Wall Insulation

Yours truly at the business end of the hose
Insulating behind the lower 4' high course of drywall was relatively easy and gave us a chance to practice our technique.  Insulating behind the second course of drywall up to the 8' level was more challenging.  Not only did I have to hassle with a ladder or a mobile scaffold and, despite using a headlight, visibility into the wall cavity was limited by the 4" space between the 2 x 6 tandem top plates.  However, insulating behind the lower course of drywall gave me confidence that gravity would pull the hulls into all of the nooks and grannies up to the bottom of the top plates.  At that point it was necessary to overfill the wall slightly then reach through the opening between the top plates and manually pack the hulls into the corners under the plates. The amount of dust raised due to the proximity of the ceiling was much worse than it had been with the first course.  I was definitely thankful for the mask and swim goggles and amused later to find hulls between all of the multiple layers clothing that I wore against 40 degree temperatures.

We filled the wall cavities brimming full so that there would be no doubt that the junction between walls and ceilings would be filled uninterruptedly when later the insulation would be blown into the space above the first 4' course of ceiling panels.  By the time the walls were filled, not quite half of the original 768 bags of hulls had been consumed.

Getting the Ceiling Ready for Insulation

First floor ceiling showing the temporary strips
supporting the weight of the rice hulls until
 they can be replaced by definitive trim boards.
In the chart comparing rice hulls with cellulose insulation in the previous post, I pointed out that the rice hulls, at nearly three times the weight of cellulose and at a depth of 18", might cause the ceiling drywall to pull loose from its screws if installed directly to the roof trusses unassisted.  So I decided to kill two birds with one stone -- add support while creating an architectural feature that we had been considering in any case.

For all of the ceilings in the main rooms, upstairs and down, the esthetic effect that we had been contemplating was a 4' x 4' grid pattern comprising 1 x 6 trim boards wide enough to cover the beveled edges of adjacent drywall panels.  To that end, we installed the drywall in the usual manner with screw spacing a little closer than normal.   As a temporary support measure, we added 3/4" x 2" strips screwed through the drywall and into the trusses.  They were less than 4' long so as not to interfere with the east-west final trim pieces that will run perpendicular to the trusses, be screwed or nailed to the trusses and cover the seams between drywall panels in lieu of taping.  The plan is to remove the temporary strips when the final longitudinal trim is in place then replace them with the trim pieces that complete the grid pattern.  

Installing the Ceiling Drywall

First floor ceiling bays being filled with rice hulls
as seen through the second floor wall.
For the ceilings on both floors, we hung only one course of drywall next to the wall then insulated it in order to be sure that the junction between walls and ceilings was thoroughly filled and compacted with hulls.  We found that the blower did not shoot the hulls with enough force and sufficient distance for us to insulate with confidence more than one course at once so we stuck with doing each course separately.  The highest part of the first floor cathedral ceiling was filled by reaching through the second story wall, as seen in the nearby photo.  The highest part of the second story ceiling -- the last space to be insulated -- was our biggest challenge due to limited access.  We switched to installing the last course of drywall one 4' x 4' panel at a time starting at the southwest corner and proceeding to the southeast corner.  That way, we were in better position to blend the insulation with that already in the wall despite having to work crossways of the trusses instead with them as was possible with the rest of the ceilings.

Sunday, January 3, 2021

Construction - Insulating with Rice Hulls - Cellulose vs. Rice Hull Insulation

Part of the shipment of rice hulls.
Part of the shipment of bagged rice hulls.

Insulating with rice hulls has been for us a drawn-out process whereby the drywalling has to be staged then filled with hulls incrementally.  Consequently, I will not be blogging on the drywall-insulating process until it is done, probably a couple of months from now.  Meanwhile, this is a good time to pause and compare rice hulls with cellulose, the only other low-cost insulating material that is even close to being as sustainable a rice hulls.


We committed to the use of hulls early on based upon the ridiculously low cost estimates put forth by Olivier in his 
quintessential article and validated later during a phone conversation with him, at least for those of us living close to the rice belt where freight costs were manageable.  My calculation at the time said that rice hulls would cost about a fourth of the cost of cellulose and about a third of the cost of fiberglass.  That said, their use did give me pause from the very beginning, despite their lure as an  innovative, intriguing  and enticingly sustainable choice for insulating.  If the millers were parboiling rice before separating the grain from

Close-up of rice hulls.

the hulls in those days, I did not pick up on it.  I expected to have to buy raw hulls delivered in bulk via a walking floor trailer (see the 2016 post on rice hulls), which would mean that managing any rice weevils would depend solely on the effectiveness of diatomaceous earth (DE) as an insecticide (DE was a topic in the previous post).  Added to that concern was the complicated logistics of receiving and storing a trailer-load of loose hulls.  As it turns out four years later, rather than being cheaper, the cost of the hulls is slightly higher than cellulose probably would have been and freight costs are much higher than four years ago due to a nation-wide shortage of trucks and truckers.  On the other hand, though, parboiling the rice before milling ostensibly solves the weevil problem and receiving the hulls in bags solves the handling problem.  So I consider the sticker shock as a reasonable trade off for the convenience of having bagged hulls without rice weevils and for the personal experience that allows me to blog on a subject for which there seems to be considerable interest but little precedent (e.g., the 2016 post on rice hulls is the second most visited among the +/-140 posts to this blog so far.)

Following is a comparison of rice hulls and cellulose.


Advantages of Rice Hulls

The advantage of hulls that appeals most to me is the lack of settling once they are blown and, where appropriate (ceilings), also packed to place.  It is comforting to know that the walls, a few of which were nearly 12' high, and ceilings will remain packed tight and maintain the original R-factor for the life of the building.  The second most important advantage would have to be the natural fire resistance of the hulls in thicknesses of 15" in the walls and 18" in the ceilings.  By enveloping the wood structural elements and the electrical system in a flame-retarding and self-extinguishing medium, the shell of the house is virtually fireproof, particularly since the exterior is covered with metal roofing and metal siding.  And the natural resistance to moisture of the hulls does two things, (a) stabilizes the R-factor that would be compromised with moisture-absorbing cellulose and (b) inhibits fungal growth without the use of noxious chemicals.  Another consideration that compliments our green project is the low embodied energy of the hulls, most of which resides in their transportation rather than in the hulls themselves, and the fact that they can be recycled indefinitely.  Still another, rather serendipitous advantage, is the excuse to introduce diatomaceous earth into the wall and ceiling cavities that will linger as an environmentally-friendly insecticide for as long as the building exists.

Disadvantages of Rice Hulls

Aside from sticker shock, the biggest obstacle for the universal use of hulls for insulation is the high freight costs beyond the Midwest.  And there are four other disadvantages.  (1) The need for more robust ceiling construction.   The hulls have roughly three times the weight of cellulose and could cause the drywall to pull free of its screws or perhaps sag between roof trusses, especially where two beveled edges come together at a right angle to the trusses. The way we modified typical ceiling construction for additional support will be explained in a subsequent post on drywalling.  (2) The hassle for a DIYer of buying and selling a blower for a one-off project.  (3) Dealing with the excessive dust raised by the hulls.  Having limited experience with cellulose, I have no idea how dusty it would be compared to the hulls if it were to be blown into the confined spaces of our 15" wall 

Concrete first floor showing the amount of dust accumulation
despite having already been swept twice.
cavities and 18" cathedral ceiling cavities whereby the dust blows directly back into the face of the operator.  I can say with authority that the dust was so thick that it is impossible to see the progress of the filling without stopping the blower or diverting the hose to the next bay temporarily to clear the dust and check progress.  (And, as the nearby picture shows, the amount of dust accumulating on all surfaces was formidable.)  After a while, though, the blowing became so routine, especially for the ceilings, that I worked as much by feel as by sight.  It helped also to limit the amount of space to be filled for both the walls and ceilings to the width of a sheet of drywall, i.e., no more than 4' at a time. (4)  Relatively slow flow rate.  The industrial strength insulation blower that we purchased, was able to push the hulls through 50' of hose without difficulty, requiring +/- 4 min to move one bag of hulls (+/- 6 cu ft), which was about as fast as the second worker could open the bags, add the diatomaceous earth and scoop the hulls into the hopper.  

In the chart above, the rest of the factors that compare cellulose with hulls are essentially a wash.

The next posts will document our practical experiences with the rice hulls.